Concrete is a strong and durable material, but it can still be damaged over time. Addressing problems promptly helps prevent further damage and saves time and money in the long run.
Concrete Repair Bismarck requires meticulous assessment, precise execution, and sufficient curing time. Skipping surface preparation or rushing the curing process can lead to failure of the repair.
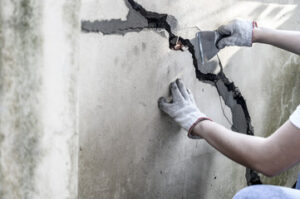
Cracks in concrete are common and can cause damage if not repaired quickly. They can create trip hazards and may allow water to pool, creating a breeding ground for pests. Proper maintenance and regular inspections can catch small cracks before they become serious problems, preventing further issues down the road and saving money.
The best repair method depends on the type and severity of the crack. For surface cracks, a simple cement patching compound can be used to fill the crack and smooth it out. For larger cracks that threaten structural integrity, epoxy injection is a durable and effective solution.
Before beginning any concrete crack repair, it is important to clean the area and make sure that any debris has been removed. This step is essential to ensure that the new patching material will stick and adhere properly. If you are repairing a wide crack, you may also want to undercut the sides of the crack by chiseling them out in an inverted V-shape. This will provide a wider base for the patching material to hold on to and will help prevent the crack from re-occurring.
Other repair methods include the use of bonding agents and pre-stressing steel. These methods can help improve the durability of a concrete repair and increase its resistance to freeze-thaw cycles.
It is also a good idea to apply a sealant after any concrete repairs are completed. This will help protect the repair from weathering and harsh chemicals, extending its lifespan and minimizing future issues.
Depending on the extent of the damage, it may be necessary to hire a professional contractor to assess the situation and recommend a repair strategy. A contractor will be able to identify the underlying causes of the damage and determine which repair method is best suited for the job.
While concrete will never be completely free of cracks, understanding the curing process and underlying causes can help to alleviate anxiety about minor cracks and reassure homeowners that they are taking proactive steps to protect their property. With proper inspections, regular maintenance and quick repairs when needed, homeowners can rest assured that their concrete surfaces will continue to look beautiful for years to come.
Leaks
Some leaks are easy to spot, such as a dripping faucet or a leak around the base of a toilet. Other leaks are more difficult to detect, such as those that develop underneath a concrete foundation and can result in significant structural damage if they go unchecked for long. Luckily, there are some early warning signs of a slab leak that homeowners should look for to help prevent costly repair bills down the line.
Slab leaks occur when a plumbing system develops a leak under a building’s concrete slab foundation. These leaks can cause serious problems for a home or business, including water damage and potential mold growth. Learn more about these hidden leaks, how they can damage your property, and the best ways to address them.
If you suspect a slab leak, the first thing to do is shut off all of your home’s water sources, then check your water meter. If the meter is still moving, your plumbing has a leak that needs to be addressed. Next, take a look at your floor to see if there are any unexplained stains or spots that indicate water is being pushed up through the concrete flooring.
Moisture that accumulates near windows is also a common sign of slab leaks. Water leaking under the concrete can push up through cracks in the slab and into living areas, where it can damage floors and furniture.
When addressing slab leaks, it’s important to choose the right repair method. For example, surface patching can work well for minor cracks and localized leaks. This technique involves injecting epoxy resin into hairline cracks and fissures to penetrate and seal them. For more severe cracks, polyurethane grout injection is often the preferred option due to its high-performance capabilities. This material is particularly ideal for concrete structures prone to movement, as it can withstand even significant structural shifts without losing its sealing abilities.
The most effective way to repair a slab leak is to use a specialist, who will precisely locate the problem using specialized equipment. Then, they’ll cut into the concrete slab to access the leaking pipe and replace it with a new one. This method is often the most expensive, but it’s also one of the most effective at preventing further damage.
Crack Repair
Cracks in concrete surfaces are a natural occurrence and can be caused by a number of factors. However, cracks can also indicate a more serious problem, such as soil instability that can lead to shifting and settlement of the slab. While it is difficult to prevent all concrete cracks, you can take steps to repair them as soon as they appear to ensure the stability of your home or business.
The first step in concrete crack repair is cleaning the area around the crack with a pressure washer and detergent to remove any debris that may be stuck in the crack. This will help to ensure that the crack repair material adheres to the concrete properly. Next, you will need to decide what type of crack repair you will use. Narrow cracks that are less than 1/4 inch wide can be repaired using a masonry concrete patching compound that comes in cartridges designed to fit into a caulking gun. Larger cracks will require a more involved process that involves using foam backer rod to fill the crack and creating a concrete patch.
Depending on the severity of your concrete cracks, you may choose to use a polymer-based grout or epoxy injection to fix them. Epoxy injection is typically used for structural crack repairs that involve basements and foundations. Polymer-based grouts are commonly used for concrete repair because they do not shrink and have varying viscosities that can be used to target specific areas of the crack.
When using a polymer-based grout, it is important to follow the manufacturer’s directions for proper application. It is also a good idea to wear rubber gloves and safety glasses when handling the product as well as to clean the surface of any dirt or debris that may be stuck to it. If you are using an epoxy injection, you will need to drill holes along the crack and insert injection packers or “injectors” that will allow you to inject the epoxy into the crack.
Rhino carbon fiber concrete crack lock stitches are an evolution of rebar and are a more cost-effective solution to repairing and reinforcing concrete cracks than traditional rebar. They are easy to install, do not rust and are ideal for repairing concrete slabs, poured walls and swimming pools.
Spalling
Spalling is not as obvious as cracks, but it can be equally damaging to concrete surfaces. The process involves exposing aggregates through small pock marks in the surface of the concrete. The voids also increase the permeability of the concrete, allowing water and salts to seep in and accelerate deterioration. In addition to weakening the concrete, spalling can also pose safety hazards and reduce the marketability of commercial or residential properties.
To prevent spalling, it’s important to maintain adequate concrete cover for reinforcing steel and use corrosion inhibitors to slow down rust. It’s also a good idea to resurface concrete surfaces with coatings or adhesives that provide additional protection against moisture and chemicals. Regular inspections can help detect spalling early on, allowing it to be addressed before the damage becomes more serious.
In the case of concrete spalling, repairing it requires knocking off loose fragments and cleaning the damaged area. A hammer or chisel should be used to carefully chip away any exposed rebar and ensure that the concrete repair product can bond to it properly. In the case of significant spalling, the best option may be to replace the affected area with new concrete. It’s essential to work with a professional contractor to ensure that the replacement concrete is properly mixed, poured, and cured.
Whether you have minor cracks, large holes, or areas of spalling, it’s important to contact a local concrete repair company to get the job done right. Concrete experts can identify the root cause of your concrete deterioration and recommend the appropriate repair method to ensure that your concrete remains safe, stable, and attractive for years to come. Sign up for our newsletter to receive tips and tricks on how to maintain your concrete. You can unsubscribe at any time. Message and data rates may apply. You may have to enter your email address twice to confirm. This is to verify that you are a human and not a spam bot. We will never share your information with any third party. By clicking “Subscribe,” you agree to these terms.