Electricians install, maintain and repair electrical power, communications, lighting, and control systems in homes, businesses, and factories. Their work helps make our lives and jobs easier, safer, and more comfortable.
To be a successful electrician, it’s essential to understand how your brain works best and what kind of learning style you have. Knowing your strengths and weaknesses can help you focus when studying for your journeyman electrician license exam. Contact Ampi Electric Inc. for professional help.
Many homes have electrical systems that are outdated and not up to modern standards. Today’s homes require more power for electronic devices, at-home entertainment, and appliances. If you’re experiencing flickering lights, tripped switches or discolored outlets, it may be time for an upgrade. An electrician can help you find the right electrical upgrades to improve safety, energy efficiency, and overall home comfort.
The most important part of your home’s electrical system is the panel. It’s where the fuses or circuit breakers are located and distributes the electricity throughout the house. A residential electrical panel upgrade (also known as a “heavy up”) allows your home to have more breaker space and capacity, ensuring that it can handle the demands of your appliances.
An electrical panel upgrade can also replace older fuses or breakers that are antiquated, damaged or dangerous. This can help protect your home from a potentially deadly fire caused by overheating. Having an updated electrical panel can also be a selling point if you decide to sell your home in the future.
Many older homes have faulty wiring that can cause overheating and even fires. This can be a serious problem, especially if you have children or pets that live in the home. An electrician can inspect your home and install new copper connectors at receptacles to prevent tripping or overheating.
Switches
Switches are manually operated electromechanical devices with one or more sets of electrical contacts, which connect external circuits. They can be either “closed” (the contact points touch and electricity flows between them) or “open” (the contacts separate and the switch is nonconducting). Switches are available in many shapes and sizes, including stand-alone units intended to sit on a desktop or in a wiring closet; rack-mounted switches for use in a cabinet, rack or enclosure; and panel mounted switches for mounting into a floor box or cable duct.
Most switches are designed to control 120-volt household circuits, and are commonly referred to as single-pole, single-throw (SPST), because they have only two terminals that can be connected to or disconnected from each other. They are usually made of a metal such as silver or copper for electrical conductivity, hardness and resistance to corrosion. The contact surfaces are plated with noble metals to resist the formation of insulating oxide layers. To ensure the integrity of the contact surface, they may be wiped by a wiper blade or coated with an insulating plastic.
Some switches can also be used to control high-powered circuits such as AC motors. These are usually rated at higher horsepower (HP) ratings and have additional safety features such as a reduced wetting current to prevent overheating of the contact material.
The type of switch you need will depend on how it will be used, and the wiring that is already in place. Light switches, for example, can be either power-through switches or end-line switches. Power comes into the switch box from the service panel through a neutral white line and is fed into the fixture through a hot black wire. Power-through switches are the simplest to wire. End-line switches are usually more complicated, and work in pairs to control a light or appliance from two different wall locations.
Outlets
It’s important for you to know about the different types of electrical outlets in your home so you can make sure they’re all up to code and serving their purpose. Outlets can be used for more than just plugging electronics into; they can also serve as a safety measure in the event of an accident.
Two-prong outlets, while still commonly found in older houses, are almost non-existent in new homes because they lack the safety feature of a grounding wire. This can lead to a higher risk of electric shock, especially for children, which can be very dangerous. It’s highly recommended that you replace any existing 2-prong outlets with 3-prong ones, and have an electrician handle the wiring for newer, safer outlets.
GFCI outlets are designed for areas where you’ll be using appliances near water, such as bathrooms, laundry rooms, kitchens, basements, and outdoor areas. They’re usually required for locations within 6 horizontal feet of a sink basin. AFCI outlets are designed to help prevent fires by identifying unsafe electrical conditions (like wires that are touching, overheating, or exposed) and turning off the power before they cause an accident.
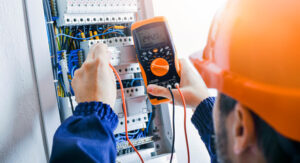
Before you start any work on your outlets, make sure the power is completely OFF by shutting off your circuit breaker or flipping the switch in your service panel. Next, use a multimeter set to ohms to test the voltage on one of your outlets. If it reads anywhere between zero and 120 volts, the outlet is safe. If the volts are significantly higher than 120, it’s time to call an electrician to replace the outlet. You should also check that the breaker box isn’t currently on, either by turning it off with a switch or by removing the cover and using a stud finder to confirm no live power exists inside.
Light Fixtures
Whether you’re looking to change a light fixture for an upgrade or just because you like the new look, an electrician can help. While changing a light fixture is a project that many DIYers can tackle, wiring work is involved and should only be done by a qualified electrician.
First, locate your home’s circuit panel and switch off power for the circuit where the old light fixture is located. You can also use a voltage tester to verify that the electricity is no longer flowing to the light fixture.
Next, you’ll need to remove the existing fixture. This is typically as simple as unscrewing the canopy (rounded piece) from your ceiling. This will reveal the wires that connect to your ceiling. The black and white wires will be connected together with a red wire connector cap, which you’ll want to remove. Using a wire stripper, remove the plastic from each end of each fixture wire to expose the copper core. Then, you can connect the bare copper wires to their corresponding wires in your ceiling by wrapping them around each other and then twisting together. The grounding wire, which is green, will either connect to a screw on the ceiling’s grounding bar or you can install a dedicated copper wire coming from your junction box in the ceiling.
Most light fixtures come with instructions that will guide you through the process. Follow these instructions, paying attention to any special requirements for your specific light fixture. It’s best to have another person on hand, especially if the fixture is heavy or difficult to move. Once the new light fixture is mounted, it’s time to connect the wires.
Wiring
A lot of knowledge goes into being a professional electrician. For the homeowner looking to take on a DIY project, understanding electrical wiring is an essential part of the process. This includes understanding the different types of wire, common coding and sizing, and creating an electrical wiring diagram before starting any projects.
Wires are pieces of metal that transport electricity. They are a key component to every electronic device, from the circuit board inside your computer to the electrical transmission lines that carry electricity hundreds of kilometers. While there are many different kinds of wires, the most important thing to remember is that they must always be protected from abrasion, water, and other damage. This is why all wires are insulated.
Most electrical wiring in homes is non-metallic conduit (NM). NM cable consists of an outer sheathing or jacket that houses inner copper wires. The sheathing is usually green, black, red or white to make it easy to identify the purpose of each wire. For example, black wires (also referred to as hot wires) carry live electric current from the service panel to outlets and light switches throughout the home. Red and blue wires are used for ground connections.
There are also some types of surface conduit wiring. This type of wiring has holes drilled in the wall or ceiling, and then pipes or steel conduit is run through these holes. This system is more difficult to work with than NM cable, and it isn’t as safe as a properly installed GFCI.
The other thing to consider when choosing the right wire for your needs is the gauge. Larger wires have thicker insulation than smaller ones. Additionally, the material the wire is made from is an important consideration. For example, copper conducts electricity well, but it can be expensive. That’s why some people use aluminum or copper-clad aluminum wire instead.